Springboot Websocket Stomp 消息订阅推送
闲话不扯,直奔主题。需要和web前端建立长链接,互相实时通讯,因此想到了websocket,后面随着需求的变更,需要用户订阅主题,实现消息的精准推送,发布订阅等,则想到了STOMP(Simple Text-Orientated Messaging Protocol) 面向消息的简单文本协议。
websocket协议想到了之前写的一个websocket长链接的demo,也贴上代码供大家参考。
pom文件直接引入spring-boot-starter-websocket即可。
<dependency> <groupId>org.springframework.boot</groupId> <artifactId>spring-boot-starter-websocket</artifactId></dependency>
声明websocket endpoint
import org.springframework.context.annotation.Bean;import org.springframework.context.annotation.Configuration;import org.springframework.web.socket.server.standard.ServerEndpointExporter;/** * @ClassName WebSocketConfig * @Author scott * @Date 2021/6/16 * @Version V1.0 **/@Configurationpublic class WebSocketConfig { /** * 注入一个ServerEndpointExporter,该Bean会自动注册使用@ServerEndpoint注解申明的websocket endpoint */ @Bean public ServerEndpointExporter serverEndpointExporter() {return new ServerEndpointExporter(); }}
websocket实现类,其中通过注解监听了各种事件,实现了推送消息等相关逻辑
import com.google.common.cache.Cache;import com.google.common.cache.CacheBuilder;import com.ruoyi.common.core.domain.AjaxResult;import org.slf4j.Logger;import org.slf4j.LoggerFactory;import org.springframework.stereotype.Component;import javax.websocket.*;import javax.websocket.server.PathParam;import javax.websocket.server.ServerEndpoint;import java.util.Objects;import java.util.Set;import java.util.concurrent.ConcurrentMap;import java.util.concurrent.TimeUnit;import java.util.concurrent.atomic.AtomicInteger;/** * @ClassName: DataTypePushWebSocket * @Author: scott * @Date: 2021/6/16**/@ServerEndpoint(value = '/ws/dataType/push/{token}')@Componentpublic class DataTypePushWebSocket { private static final Logger log = LoggerFactory.getLogger(DataTypePushWebSocket.class); /** * 记录当前在线连接数 */ private static AtomicInteger onlineCount = new AtomicInteger(0); private static Cache<String, Session> SESSION_CACHE = CacheBuilder.newBuilder() .initialCapacity(10) .maximumSize(300) .expireAfterWrite(10, TimeUnit.MINUTES) .build(); /** * 连接建立成功调用的方法 */ @OnOpen public void onOpen(Session session, @PathParam('token')String token) {String sessionId = session.getId();onlineCount.incrementAndGet(); // 在线数加1this.sendMessage('sessionId:' + sessionId +',已经和server建立连接', session);SESSION_CACHE.put(sessionId,session);log.info('有新连接加入:{},当前在线连接数为:{}', session.getId(), onlineCount.get()); } /** * 连接关闭调用的方法 */ @OnClose public void onClose(Session session,@PathParam('token')String token) {onlineCount.decrementAndGet(); // 在线数减1SESSION_CACHE.invalidate(session.getId());log.info('有一连接关闭:{},当前在线连接数为:{}', session.getId(), onlineCount.get()); } /** * 收到客户端消息后调用的方法 * * @param message 客户端发送过来的消息 */ @OnMessage public void onMessage(String message, Session session,@PathParam('token')String token) {log.info('服务端收到客户端[{}]的消息:{}', session.getId(), message);this.sendMessage('服务端已收到推送消息:' + message, session); } @OnError public void onError(Session session, Throwable error) {log.error('发生错误');error.printStackTrace(); } /** * 服务端发送消息给客户端 */ private static void sendMessage(String message, Session toSession) {try { log.info('服务端给客户端[{}]发送消息{}', toSession.getId(), message); toSession.getBasicRemote().sendText(message);} catch (Exception e) { log.error('服务端发送消息给客户端失败:{}', e);} } public static AjaxResult sendMessage(String message, String sessionId){Session session = SESSION_CACHE.getIfPresent(sessionId);if(Objects.isNull(session)){ return AjaxResult.error('token已失效');}sendMessage(message,session);return AjaxResult.success(); } public static AjaxResult sendBroadcast(String message){long size = SESSION_CACHE.size();if(size <=0){ return AjaxResult.error('当前没有在线客户端,无法推送消息');}ConcurrentMap<String, Session> sessionConcurrentMap = SESSION_CACHE.asMap();Set<String> keys = sessionConcurrentMap.keySet();for (String key : keys) { Session session = SESSION_CACHE.getIfPresent(key); DataTypePushWebSocket.sendMessage(message,session);}return AjaxResult.success(); }}
至此websocket服务端代码已经完成。
stomp协议前端代码.这个是在某个vue工程中写的js,各位大佬自己动手改改即可。其中Settings.wsPath是后端定义的ws地址例如ws://localhost:9003/ws
import Stomp from ’stompjs’import Settings from ’@/settings.js’export default { // 是否启用日志 默认启用 debug:true, // 客户端连接信息 stompClient:{}, // 初始化 init(callBack){ this.stompClient = Stomp.client(Settings.wsPath) this.stompClient.hasDebug = this.debug this.stompClient.connect({},suce =>{ this.console('连接成功,信息如下 ↓') this.console(this.stompClient) if(callBack){callBack() } },err => { if(err) {this.console('连接失败,信息如下 ↓')this.console(err) } }) }, // 订阅 sub(address,callBack){ if(!this.stompClient.connected){ this.console('没有连接,无法订阅') return } // 生成 id let timestamp= new Date().getTime() + address this.console('订阅成功 -> '+address) this.stompClient.subscribe(address,message => { this.console(address+' 订阅消息通知,信息如下 ↓') this.console(message) let data = message.body callBack(data) },{ id: timestamp }) }, unSub(address){ if(!this.stompClient.connected){ this.console('没有连接,无法取消订阅 -> '+address) return } let id = '' for(let item in this.stompClient.subscriptions){ if(item.endsWith(address)){id = itembreak } } this.stompClient.unsubscribe(id) this.console('取消订阅成功 -> id:'+ id + ' address:'+address) }, // 断开连接 disconnect(callBack){ if(!this.stompClient.connected){ this.console('没有连接,无法断开连接') return } this.stompClient.disconnect(() =>{ console.log('断开成功') if(callBack){callBack() } }) }, // 单位 秒 reconnect(time){ setInterval(() =>{ if(!this.stompClient.connected){this.console('重新连接中...')this.init() } },time * 1000) }, console(msg){ if(this.debug){ console.log(msg) } }, // 向订阅发送消息 send(address,msg) { this.stompClient.send(address,{},msg) }}
后端stomp config,里面都有注释,写的很详细,并且我加入了和前端的心跳ping pong。
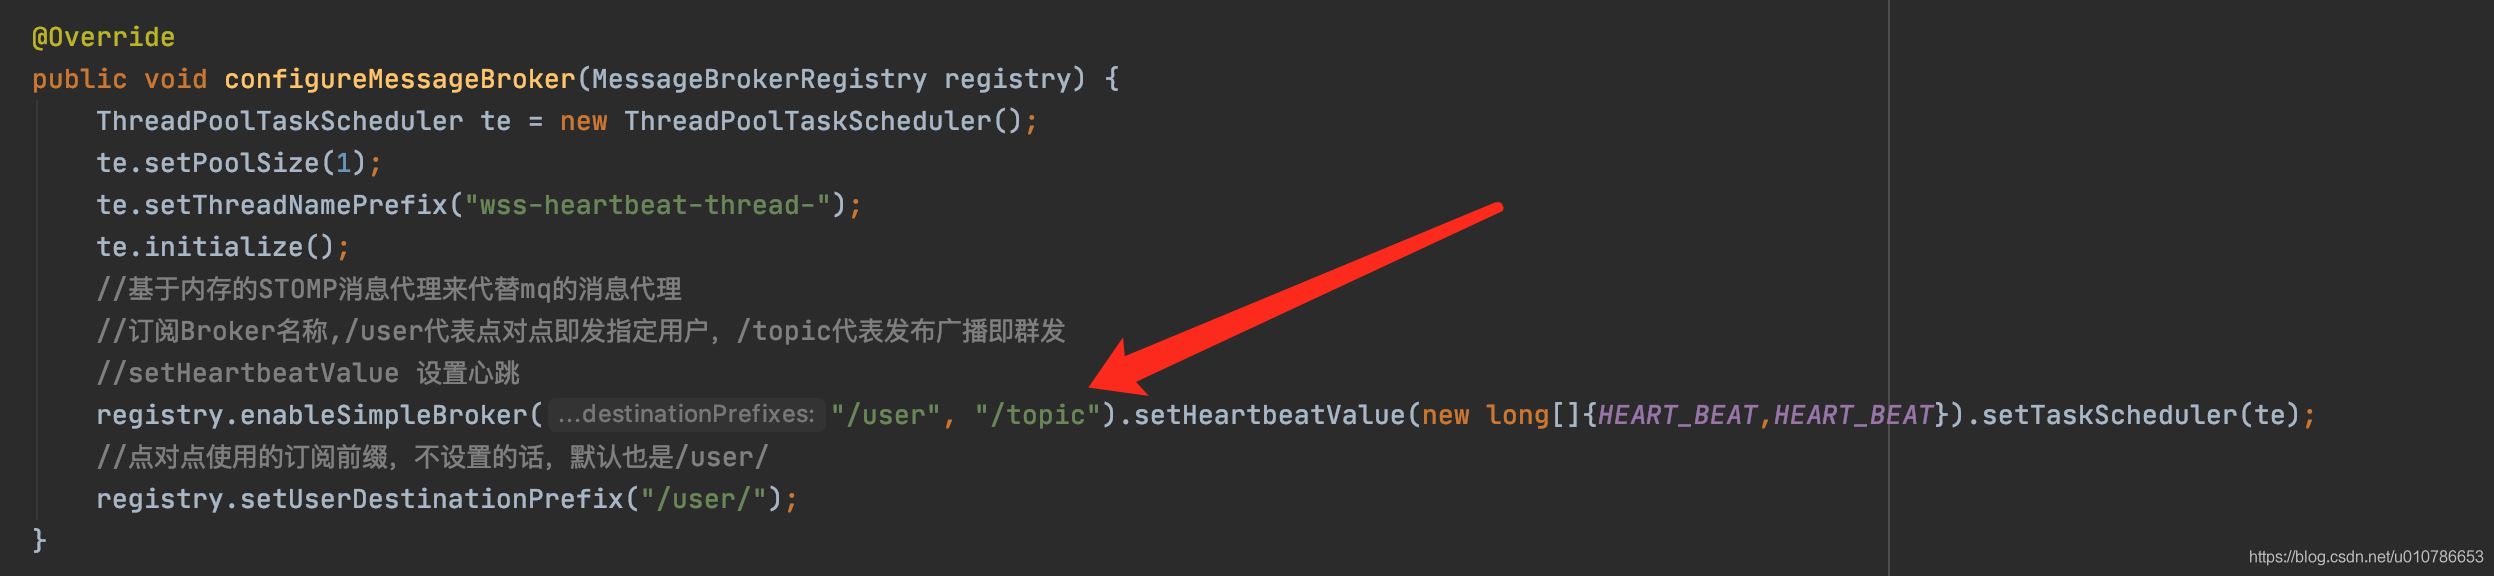
package com.cn.scott.config;import org.springframework.context.annotation.Configuration;import org.springframework.messaging.simp.config.MessageBrokerRegistry;import org.springframework.scheduling.concurrent.ThreadPoolTaskScheduler;import org.springframework.web.socket.config.annotation.EnableWebSocketMessageBroker;import org.springframework.web.socket.config.annotation.StompEndpointRegistry;import org.springframework.web.socket.config.annotation.WebSocketMessageBrokerConfigurer;/** * @ClassName: WebSocketStompConfig * @Author: scott * @Date: 2021/7/8**/@Configuration@EnableWebSocketMessageBrokerpublic class WebSocketStompConfig implements WebSocketMessageBrokerConfigurer { private static long HEART_BEAT=10000; @Override public void registerStompEndpoints(StompEndpointRegistry registry) {//允许使用socketJs方式访问,访问点为webSocket,允许跨域//在网页上我们就可以通过这个链接//ws://127.0.0.1:port/ws来和服务器的WebSocket连接registry.addEndpoint('/ws').setAllowedOrigins('*'); } @Override public void configureMessageBroker(MessageBrokerRegistry registry) {ThreadPoolTaskScheduler te = new ThreadPoolTaskScheduler();te.setPoolSize(1);te.setThreadNamePrefix('wss-heartbeat-thread-');te.initialize();//基于内存的STOMP消息代理来代替mq的消息代理//订阅Broker名称,/user代表点对点即发指定用户,/topic代表发布广播即群发//setHeartbeatValue 设置心跳及心跳时间registry.enableSimpleBroker('/user', '/topic').setHeartbeatValue(new long[]{HEART_BEAT,HEART_BEAT}).setTaskScheduler(te);//点对点使用的订阅前缀,不设置的话,默认也是/user/registry.setUserDestinationPrefix('/user/'); }}
后端stomp协议接受、订阅等动作通知
package com.cn.scott.ws;import com.alibaba.fastjson.JSON;import org.springframework.beans.factory.annotation.Autowired;import org.springframework.messaging.handler.annotation.DestinationVariable;import org.springframework.messaging.handler.annotation.MessageMapping;import org.springframework.messaging.simp.SimpMessagingTemplate;import org.springframework.messaging.simp.annotation.SubscribeMapping;import org.springframework.web.bind.annotation.RestController;/** * @ClassName StompSocketHandler * @Author scott * @Date 2021/6/30 * @Version V1.0 **/@RestControllerpublic class StompSocketHandler { @Autowired private SimpMessagingTemplate simpMessagingTemplate; /** * @MethodName: subscribeMapping * @Description: 订阅成功通知 * @Param: [id] * @Return: void * @Author: scott * @Date: 2021/6/30 **/ @SubscribeMapping('/user/{id}/listener') public void subscribeMapping(@DestinationVariable('id') final long id) {System.out.println('>>>>>>用户:'+id +',已订阅');SubscribeMsg param = new SubscribeMsg(id,String.format('用户【%s】已订阅成功', id));sendToUser(param); } /** * @MethodName: test * @Description: 接收订阅topic消息 * @Param: [id, msg] * @Return: void * @Author: scott * @Date: 2021/6/30 **/ @MessageMapping(value = '/user/{id}/listener') public void UserSubListener(@DestinationVariable long id, String msg) {System.out.println('收到客户端:' +id+',的消息');SubscribeMsg param = new SubscribeMsg(id,String.format('已收到用户【%s】发送消息【%s】', id,msg));sendToUser(param); } @GetMapping('/refresh/{userId}') public void refresh(@PathVariable Long userId, String msg) {StompSocketHandler.SubscribeMsg param = new StompSocketHandler.SubscribeMsg(userId,String.format('服务端向用户【%s】发送消息【%s】', userId,msg));sendToUser(param); } /** * @MethodName: sendToUser * @Description: 推送消息给订阅用户 * @Param: [userId] * @Return: void * @Author: scott * @Date: 2021/6/30 **/ public void sendToUser(SubscribeMsg screenChangeMsg){//这里可以控制权限等。。。simpMessagingTemplate.convertAndSendToUser(screenChangeMsg.getUserId().toString(),'/listener', JSON.toJSONString(screenChangeMsg)); } /** * @MethodName: sendBroadCast * @Description: 发送广播,需要用户事先订阅广播 * @Param: [topic, msg] * @Return: void * @Author: scott * @Date: 2021/6/30 **/ public void sendBroadCast(String topic,String msg){simpMessagingTemplate.convertAndSend(topic,msg); } /** * @ClassName: SubMsg * @Author: scott * @Date: 2021/6/30 **/ public static class SubscribeMsg {private Long userId;private String msg;public SubscribeMsg(Long UserId, String msg){ this.userId = UserId; this.msg = msg;}public Long getUserId() { return userId;}public String getMsg() { return msg;} }}
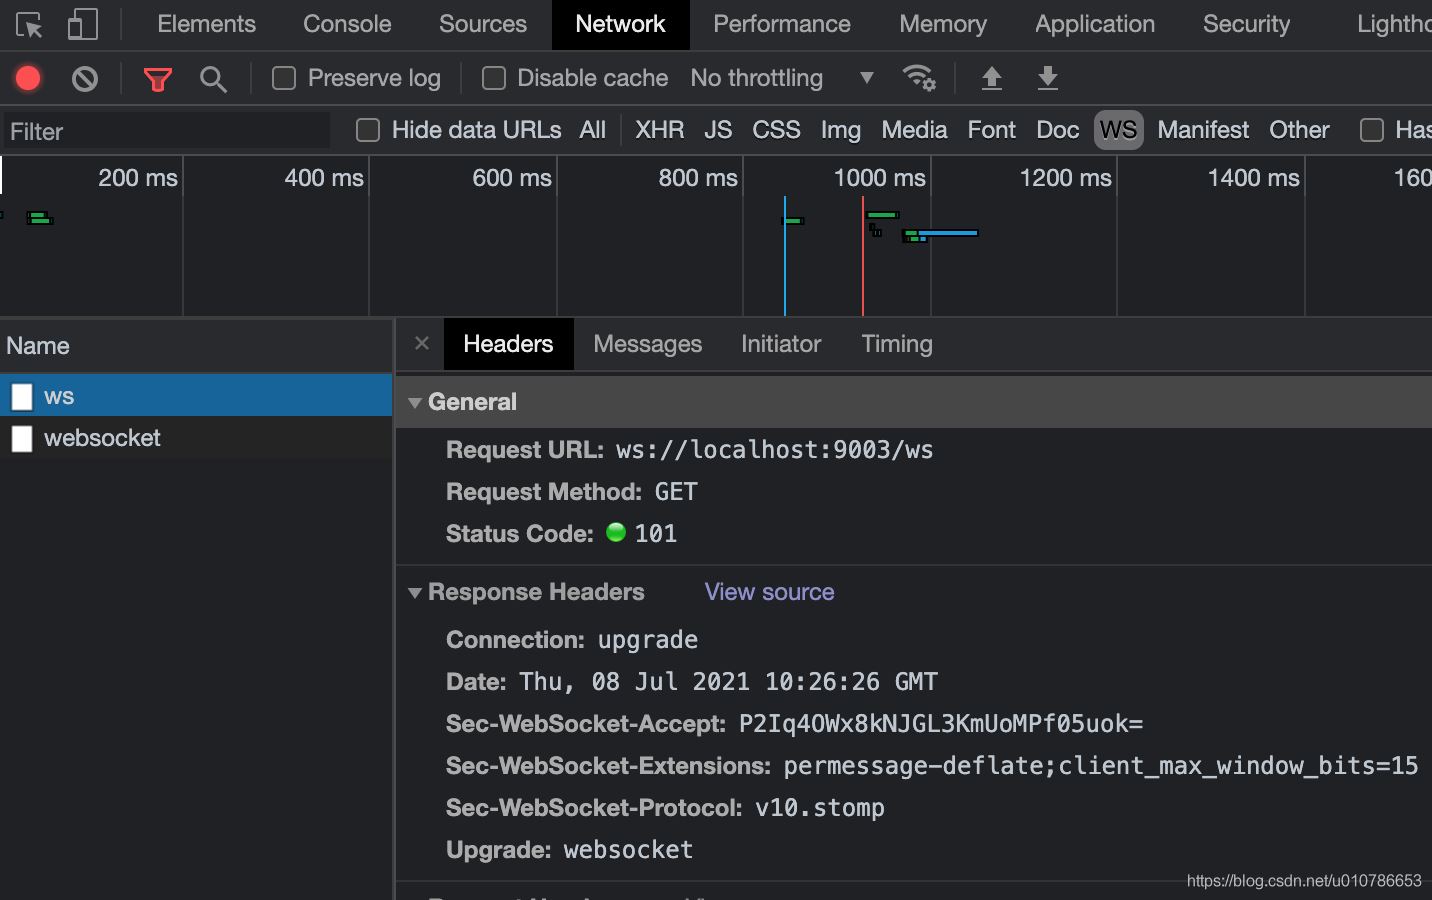
连接展示
建立连接成功,这里可以看出是基于websocket协议
连接信息
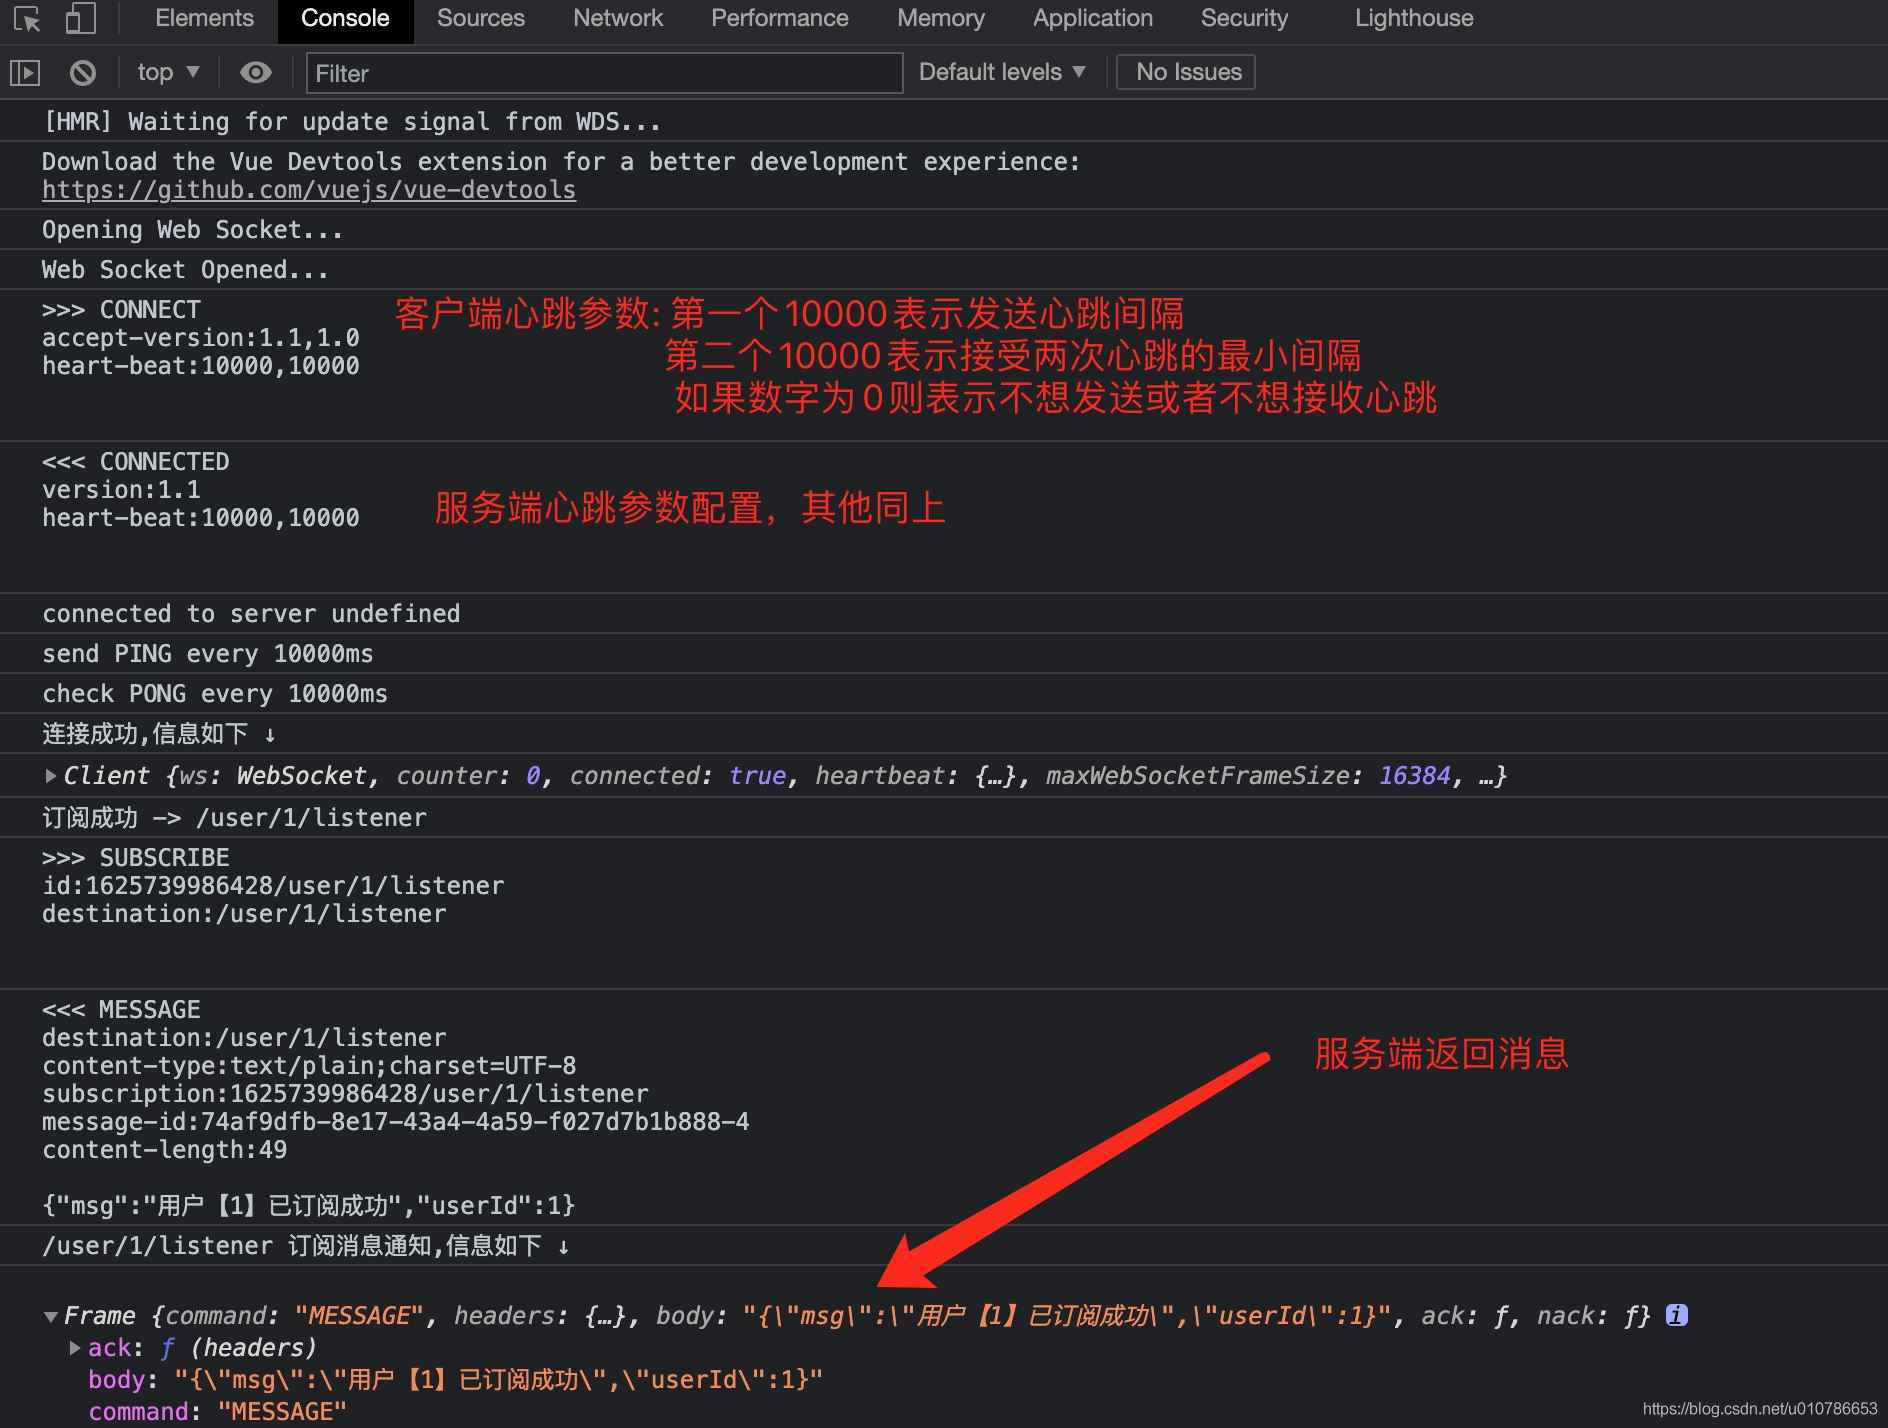
ping pong

调用接口向订阅用户1发送消息,http://localhost:9003/refresh/1?msg=HelloStomp,可以在客户端控制台查看已经收到了消息。这个时候不同用户通过自己的userId可以区分订阅的主题,可以做到通过userId精准的往客户端推送消息。

还记得我们在后端配置的时候还指定了广播的订阅主题/topic,这时我们前端通过js只要订阅了这个主题,那么后端在像这个主题推送消息时,所有订阅的客户端都能收到,感兴趣的小伙伴可以自己试试,api我都写好了。
至此,实战完毕,喜欢的小伙伴麻烦关注加点赞。
springboot + stomp后端源码地址:https://gitee.com/ErGouGeSiBaKe/stomp-server
到此这篇关于Springboot Websocket Stomp 消息订阅推送的文章就介绍到这了,更多相关Springboot Websocket Stomp 消息订阅推送内容请搜索好吧啦网以前的文章或继续浏览下面的相关文章希望大家以后多多支持好吧啦网!
相关文章:

 网公网安备
网公网安备