vue中的v-model原理,与组件自定义v-model详解
VUE中的v-model可以实现双向绑定,但是原理是什么呢?往下看看吧
根据官方文档的解释,v-model其实是一个语法糖,它会自动的在元素或者组件上面解析为 :value='' 和 @input='', 就像下面这样
// 标准写法 <input v-model='name'> // 等价于 <input :value='name' @input='name = $event.target.value'> // 在组件上面时 <div :value='name' @input='name = $event'></div>
1.当在input输入框输入内容时,会自动的触发input事件,更新绑定的name值。
2.当name的值通过JavaScript改变时,会更新input的value值
根据上面的原理,vue就通过v-model实现双向数据绑定
看了前面的解释,对于v-model有了一定的理解。下面我们就来实现自己组件上面的v-model吧
需求:实现一个简单的点击按钮,每次点击都自动的给绑定值price加100。 组件名为 AddPrice.vue
// AddPrice.vue// 通过props接受绑定的value参数<template> <div @click='$emit(’input’,value + 100 )'>点击加钱<div></template><script> export default { props: [’value’] } </script>// 在父组件中调用<add-price v-model='price'></add-price>
组件中使用props接受传入的参数值value, 组件点击事件触发并 使用$emit调用父组件上的input事件,实现了自定义的双向绑定
补充知识:vue - v-model实现自定义样式の多选与单选
这两天在玩mpvue,但是下午如果对着文档大眼瞪小眼的话,肯定会睡着的。
想起昨晚的flag,我就想直接用demo上手吧,一举两得
谁想到我好不容易快做完了,v-model在小程序中不起作用!
来不及研究为什么,我先直接在原来项目上赶紧建了一个test页面,先赶紧实现我的这种设想:
使用v-model和原生表单也可以实现这么好看且达到需求的效果。
重要的是不用自己跟在用户屁股后面屁颠屁颠的监听人家到底何时用了点击事件,又把点击事件用在何处了!
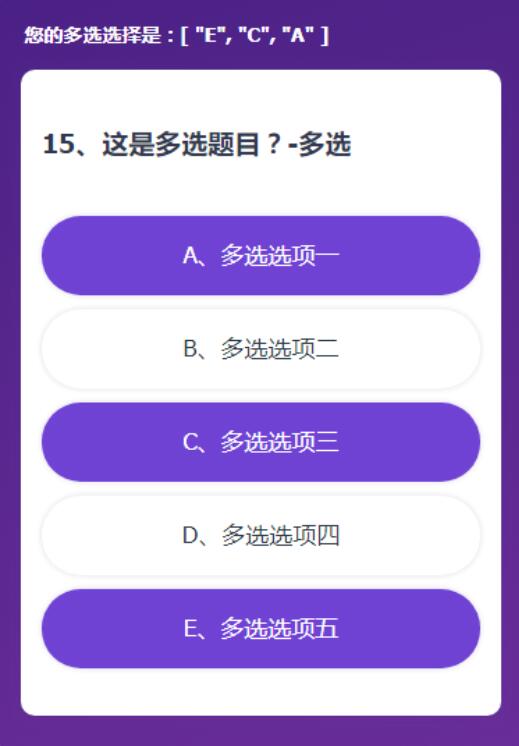
效果图如下,和之前的没什么两样呢!
具体实现我想,vue官网有关于表单输入绑定的讲解和demo,事实上,我只要做到利用他的demo把我的数据和样式调整一下就万事大吉了!
没有什么比简单解决一个功能更让人开心的了!
说干就干,我直接在原来项目代码的基础上动手:
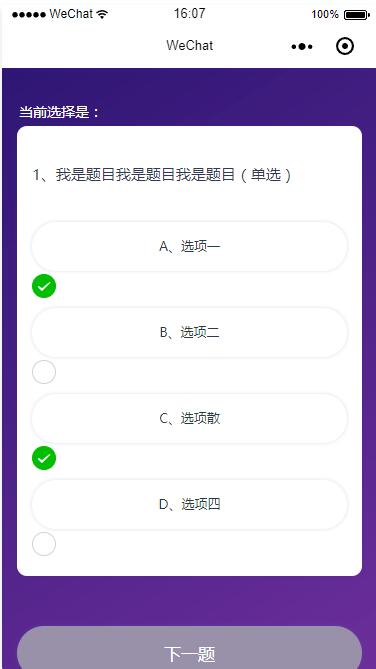
之前的选项处理就一个li孤军奋战,数据渲染、样式切换、包括点击事件都绑定在上边,
ul.qus-listli(v-for='(item,index) in state.ExamInfo.QuestionAnswerCode' @click='choosed(index)' v-bind: ref='liId') {{item.Code}}、{{item.Description}}
简直忙到没朋友啊有没有!光他和ul的长度差距就说明了一切!
现在我们把他要做的事分解一下:
现在他只负责v-for循环数据渲染
ul.qus-list
li(v-for='(item,index) in state.ExamInfo.QuestionAnswerCode' v-bind:class='{’li-focus’ : chooseNum==index}')
内部分配给他两个小弟
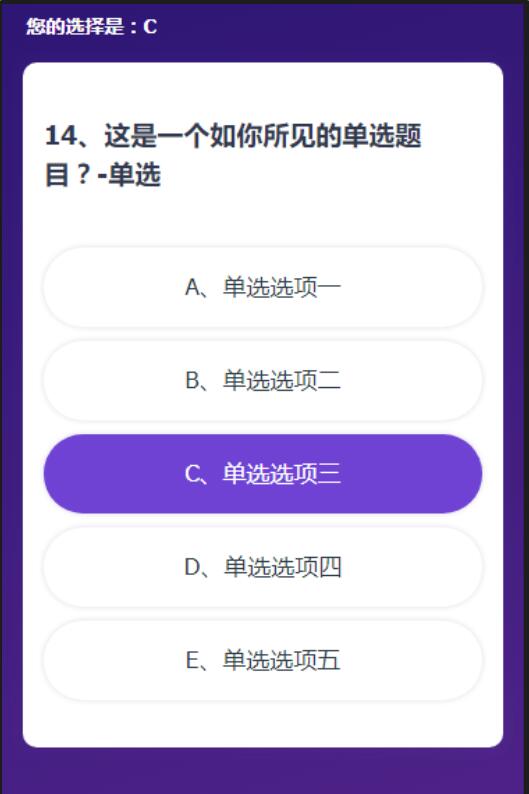
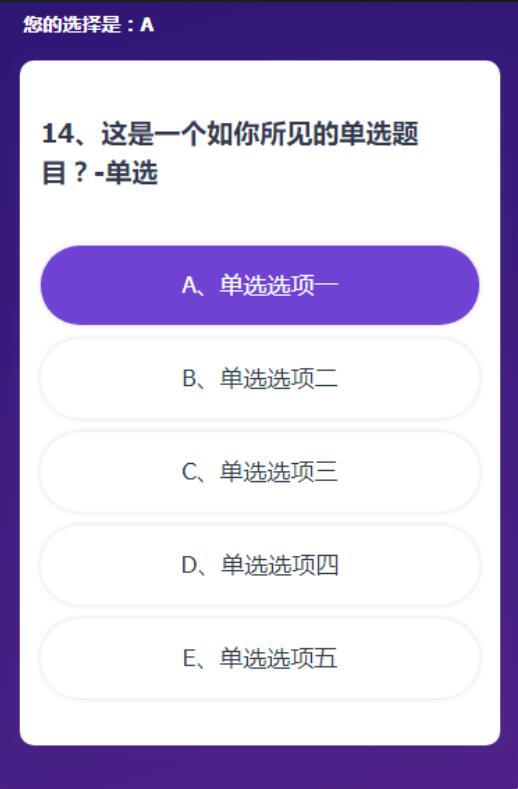
input:radio/checkbox和label,这俩人一个负责点击后与数据的绑定,一个负责样式。这么一说大神就明了了,好你可以走了,把沙发腾出来。
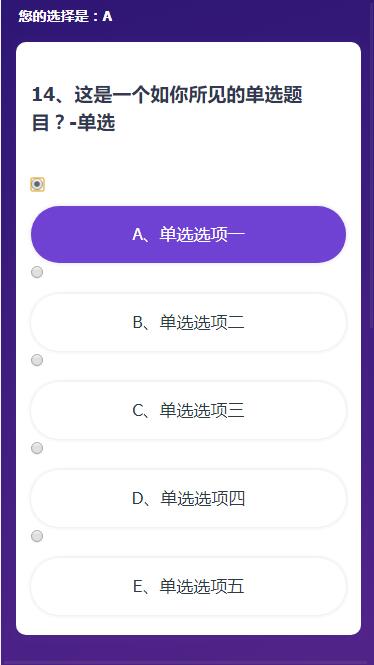
这俩人中,Input负责数据绑定,其实也就是利用v-model。具体原理直接看https://cn.vuejs.org/v2/guide/forms.html
input( type='radio' :value='item.Code' : v-model='picked')
然后时label负责样式。样式也包括用户看到的选项文本的展示:
label(:for='’choice1’+index' class='choice-item') {{item.Code}}、{{item.Description}}
至于他具体怎么负责样式?这个也利用了css的选择器
主要是:checked选择器和+相邻兄弟选择器
/*普通样式*/ .choice-item{ display: block; margin: .2rem auto 0; padding: .3rem .3rem .34rem; color: $qusTxt; font-size: .34rem; text-align: center; @include boxStyle(1rem,.12rem,rgba(49,32,114,0.16)); }/*input被选中时,label的样式*/input:checked + .choice-item{ background: $purpleClr; color: #FFF;}
于是就有了这样的样式:
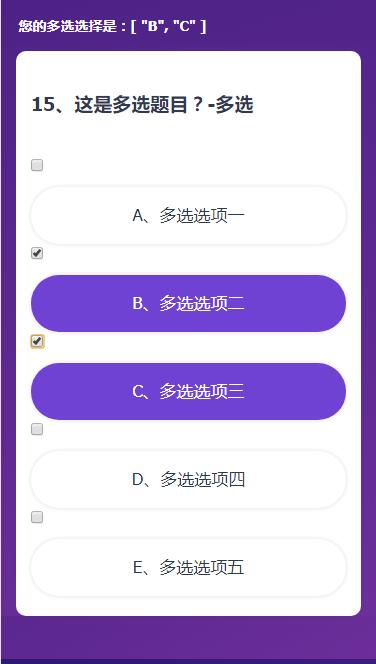
这里可以看出,二者是相互成就的关系:
首先通过html那里,label的for属性和input的id属性关联,使得点击label的时候,input也就被选择上了。
然后是css样式这里,label除了自己正常的样式,还受input被选中状态的影响,当input被选中后(input:checked),作为input在li爸爸内部的唯一兄弟元素(+选择符),label的样式就被重新更新了选中态。
因为选中展示的效果被label做了,那么input也就可以归隐山林,幽香田园生活了。所以直接设置样式不可见即可。
这也就是我上一篇说的,不会巧妙的利用每一个代码的特性。
而这一篇的实现方式正是还算巧妙的利用了该用的知识点。
也就不再需要li身上绑定的哪个choose事件来监听用户点击了。代码自己给我们做了!
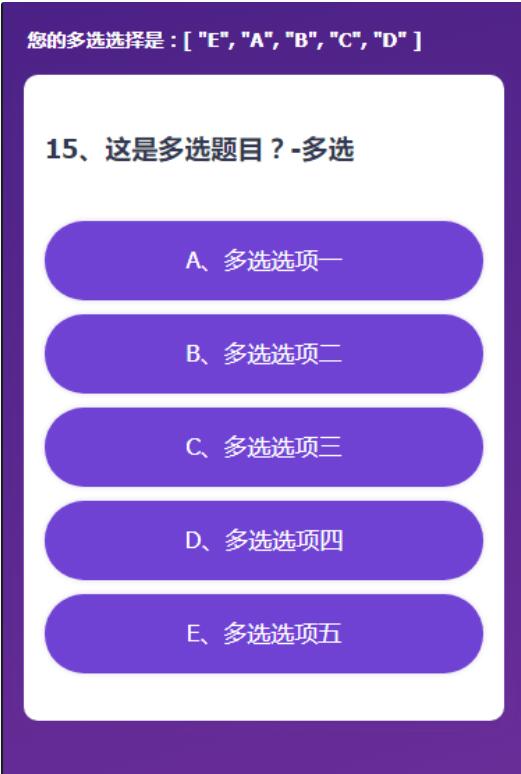
甚至最后连用户选了什么都不用管,直接将v-model绑定的变量传给后端即可。
强大的v-model!
最后因为本需求有多选和单选,作为单页应用,又因不需要渲染很多道题目,每次只渲染一道。
所以我们可以最后根据选项判断确定是需要多选还是单选,动态的切换这两套就行了。
这么一看是不是特别简单名了!却被我之前实现的那么麻烦。。。。。我也是佩服自己光脚登山的傻劲。
整篇源码:
<template lang=’pug’> //- 答题 组件 #QuestionTest //- 弹层 layer(:layerItem='layerItem' @confirmsubmit= 'confirmSubmit($event)' @changelayershow= 'changeLayerShow($event)' @hidelayer='hideLayer($event)' v-show='showLayer') h3.zhanshi 您的选择是:{{picked}} //- 题目表单 form.question div h3.qus-title(:data-id='state.ExamInfo.QuestionID') {{state.ExamInfo.ExamQuestionNo}}、{{state.ExamInfo.Description}} ul.qus-list li(v-for='(item,index) in state.ExamInfo.QuestionAnswerCode' v-bind:class='{’li-focus’ : chooseNum==index}') input( type='radio' :value='item.Code' : v-model='picked') label(:for='’choice1’+index' class='choice-item') {{item.Code}}、{{item.Description}} h3.zhanshi 您的多选选择是:{{pickedBox}} form.question div h3.qus-title(:data-id='state.ExamInfo.QuestionID') 15、这是多选题目?-多选 ul.qus-list li(v-for='(item,index) in state.ExamInfo.QuestionAnswerCode' v-bind:class='{’li-focus’ : chooseNum==index}') input( type='checkbox' :value='item.Code' : v-model='pickedBox') label(:for='’choice2’+index' class='choice-item') {{item.Code}}、多选{{item.Description.substring(2)}}</template><script>import $axios from ’../fetch/api’export default { name: ’questiontest’, data () { return { picked: ’’, pickedBox: [], state: { dataUrl: this.$store.state.ownSet.dataUrl, progress: this.$store.state.init.ActiveProgressEnum, ExamInfo: this.$store.state.init.ExamInfo, PersonID: this.$store.state.init.PersonID, TeamID: this.$store.state.init.TeamID, }, unclickable: true, // 判断是否已选择答案,不选择不能下一题,并置灰按钮 showLayer: false, //是否显示弹层 layerItem: { isQuestion: false, isSubmit: false, //是否是最后一道题时触发“下一题'按钮,点击了提交 isSuccess: false, isLoading: false }, chooseNum: null, isFocus: false, isLast: false, isClicked: false//是否已经点击下一题,防止二次提交 } }, created(){ // 点击开始答题,新页面应该定位到顶头题干位置 document.body.scrollTop = 0; if(this.state.progress > 100107 && this.state.progress !== 100112){ alert(’您已答题完毕!’); } if(this.state.ExamInfo.QuestionID == 15){//答到14题退出的情况 //判断切换下一题和提交按钮 this.isLast = true; } }, methods: { choosed(index){ this.chooseNumStr = ’’;//初始化 // 单选or多选 if(this.state.ExamInfo.IsMulti){ // 多选 if(this.$refs.liId[index].className.length <= 0){ // 添加类 this.$refs.liId[index].className = ’li-focus’; }else{ // 选中再取消 this.$refs.liId[index].className = ’’; } // 获取选中结果 for (let i = 0; i < this.$refs.liId.length; i++) { if(this.$refs.liId[i].className.length > 0){ this.chooseNumStr += this.$refs.liId[i].innerText.substring(0,1); } } // 置灰提交按钮与否 if(this.chooseNumStr.length > 0){ this.unclickable = false; }else{ // 没有选东西,就置灰按钮 this.unclickable = true; // 注意,再添加按钮的不可点击状态 } }else{ // 单选 this.unclickable = false; this.chooseNum = index; //索引0-3对应答案A-B // 注意,这里看看最多的选项是多少个,进行下配置,当前只是配置到了F switch(index){ case 0: this.chooseNumStr = ’A’; break; case 1: this.chooseNumStr = ’B’; break; case 2: this.chooseNumStr = ’C’; break; case 3: this.chooseNumStr = ’D’; break; case 4: this.chooseNumStr = ’E’; break; case 5: this.chooseNumStr = ’F’; break; } } }, nextItem(){//下一题 if(this.$store.state.ownSet.test){ // let submitFun = false; var newExamInfo = { QuestionID: 15, Description: '这里是一个测试标题?-多选', QuestionAnswerCode: [{ Code: 'A', Description: '多选一' },{ Code: 'B', Description: '多选二' },{ Code: 'C', Description: '多选三' },{ Code: 'D', Description: '多选四' }], IsMulti: true, ExamQuestionNo: 15, PersonID: 1 } if(!this.isClicked){ // 按钮可以点击-如果提交过一次,不能二次提交,如果提交失败,可以二次提交 if(this.unclickable){ alert(’您还没有选择答案哦!’); }else{ this.isClicked = true; // 还没提交过,可以提交 this.ajaxFun(newExamInfo,false) } } }else{ if(this.state.progress > 100107 && this.state.progress != 100112){ alert(’您已答题完毕!不能重复答题。’); }else{ if(!this.isClicked){ // 按钮可以点击-如果提交过一次,不能二次提交,如果提交失败,可以二次提交 if(this.unclickable){ alert(’您还没有选择答案哦!’); }else{ this.isClicked = true; // 还没提交过,可以提交 let postData = `Type=2&PersonID=${this.state.PersonID}&QuestionID=${this.state.ExamInfo.QuestionID}&Result=${this.chooseNumStr}`;//2为下一题 if(this.state.TeamID > 0){ postData+= `&TeamID=${this.state.TeamID}`; } this.ajaxFun(postData,false) .then((response)=>{ // console.log(this.state.ExamInfo.ExamQuestionNo) }) .catch((err)=>{ this.isClicked = false; console.log(err); }); } } } } }, submitItem(){//提交按钮 if(!this.isClicked){ if(this.unclickable){ alert(’您还没有选择答案哦!’); }else if(!this.$store.state.ownSet.test){ if(this.state.progress > 100107){ alert(’您已答题完毕!不能重复答题。’); }else{ this.showLayer = true; this.layerItem.isSubmit = true; } } if(this.$store.state.ownSet.test){ this.showLayer = true; this.layerItem.isSubmit = true; } } }, confirmSubmit(data){// 提交弹层 之 确定 if(this.$store.state.ownSet.test){ this.ajaxFun(’’,true) }else{ if(!this.isClicked){ this.isClicked = true; // 发送ajax let postData = `Type=3&PersonID=${this.state.PersonID}&QuestionID=${this.state.ExamInfo.QuestionID}&Result=${this.chooseNumStr}`;//3为提交 if(this.state.TeamID > 0){ postData+= `&TeamID=${this.state.TeamID}`; } this.ajaxFun(postData,true) .then((response)=>{ // 关闭提交弹层 }) .catch((err)=>{ this.isClicked = false; console.log(err); }); } } }, changeLayerShow(data){// 提交弹层 之 取消 + 状态重置 this.showLayer = false; this.layerItem.isSubmit = false; }, hideLayer(data){ this.showLayer = false; }, ajaxFun(postData,submitFun){ let _this = this; if(this.$store.state.ownSet.test){ //测试效果 return new Promise(function(resolve,reject){ if(submitFun){ // 关闭提交弹层 _this.layerItem.isSubmit = false; } // 判断返回结果-弹层 _this.layerItem.isQuestion = true; _this.showLayer = true; setTimeout(()=>{ if(submitFun){ // 提交 // 判断返回结果 _this.layerItem.isSuccess = false; // 改值 _this.$store.dispatch(’setProgress’,100110); _this.$router.replace(’redpacket’); }else{ // 判断返回结果 _this.layerItem.isSuccess = true; // 下一题 if(_this.state.ExamInfo.QuestionID == 14){ //ExamQuestionNo //判断切换下一题和提交按钮 _this.isLast = true; } // 下一题重新赋值 _this.state.ExamInfo = postData; _this.$store.dispatch(’setExaminfo’,postData) // 点击下一题,新页面应该定位到顶头题干位置 document.body.scrollTop = 0; // 样式清空 for (let i = 0; i < _this.$refs.liId.length; i++) { _this.$refs.liId[i].className = ’’; } } _this.showLayer = false; _this.layerItem.isQuestion = false; _this.chooseNumStr = ’’; _this.chooseNum = null; _this.unclickable = true; _this.isClicked = false; }, 2000); }); }else{ return new Promise(function(resolve,reject){ if(submitFun){ // 关闭提交弹层 _this.layerItem.isSubmit = false; } _this.layerItem.isQuestion = false; _this.showLayer = true; _this.layerItem.isLoading = true; $axios.get(_this.state.dataUrl+’ExamAnswer?’+postData) .then((response)=>{ console.log(response); if(response && response.data && response.data.result === 1){ _this.layerItem.isLoading = false; _this.layerItem.isQuestion = true; // 判断返回结果 if(response.data.RetValue.proResult){ _this.layerItem.isSuccess = true; }else{ _this.layerItem.isSuccess = false; } resolve(response); setTimeout(()=>{ if(submitFun){ // 提交 // resolve(response); _this.$store.dispatch(’setUser’,response.data.RetValue); _this.$router.replace(’redpacket’); }else{ // 下一题 if(_this.state.ExamInfo.QuestionID == 14){ //ExamQuestionNo //判断切换下一题和提交按钮 _this.isLast = true; } // 下一题重新赋值 _this.state.ExamInfo = response.data.RetValue; // 点击下一题,新页面应该定位到顶头题干位置 document.body.scrollTop = 0; // 样式清空 for (let i = 0; i < _this.$refs.liId.length; i++) { _this.$refs.liId[i].className = ’’; } } _this.showLayer = false; _this.layerItem.isQuestion = false; _this.chooseNumStr = ’’; _this.chooseNum = null; _this.unclickable = true; _this.isClicked = false; }, 2000); }else{ _this.showLayer = false; _this.layerItem.isQuestion = false; _this.isClicked = false; reject(’数据提交失败,请刷新重试!’) } }) .catch((err)=>{ _this.showLayer = false; _this.layerItem.isQuestion = false; _this.isClicked = false; reject(err) }); }); } } }}</script><style scoped lang=’scss’> @import ’../assets/css/var.scss’; body{ position: relative; } .zhanshi{ padding: .1rem .35rem; color: #fff; font-size: .28rem; } .question{ position: relative; padding: .77rem .3rem .4rem; margin: .21rem .3rem 1rem; @include boxStyle(); .qus-title{ margin-bottom: .77rem; font-size: .38rem; color: $textClr; } } .qus-box{ display: inline-block; width: .3rem; height: .3rem; margin-right: .2rem; } .qus-list li{ input{ display: none; } input:checked + .choice-item{ background: $purpleClr; color: #FFF; } .choice-item{ display: block; margin: .2rem auto 0; padding: .3rem .3rem .34rem; color: $qusTxt; font-size: .34rem; text-align: center; @include boxStyle(1rem,.12rem,rgba(49,32,114,0.16)); } &.li-focus .choice-item{ background: $purpleClr; color: #FFF; } }</style>
以上这篇vue中的v-model原理,与组件自定义v-model详解就是小编分享给大家的全部内容了,希望能给大家一个参考,也希望大家多多支持好吧啦网。

 网公网安备
网公网安备