Spring中bean的初始化和销毁几种实现方式详解
Bean的生命周期 : 创建bean对象 ? 属性赋值 ? 初始化方法调用前的操作 ? 初始化方法 ? 初始化方法调用后的操作 ? …-- 销毁前操作 ? 销毁方法的调用。
【1】init-method和destroy-method
自定义初始化方法和销毁方法两种方式:xml配置和注解。
① xml配置
<bean scope='singleton' init-method='init' destroy-method='cleanUp' autowire='byName' lazy-init='true' > </bean>
② 注解配置
@Scope('singleton') @Lazy @Bean(name='person',initMethod='init',destroyMethod='cleanUp', autowire=Autowire.BY_NAME) public Person person01(){ return new Person('lisi', 20); }
单实例bean在容器创建完成前会进行创建并初始化,在容器销毁的时候进行销毁。多实例bean(scope=prototype)在第一次获取该bean实例时才会创建并初始化,且容器不负责该bean的销毁。
【2】InitializingBean 和DisposableBean
InitializingBean 接口:
public interface InitializingBean {void afterPropertiesSet() throws Exception;}
在BeanFactory设置完bean属性后执行
需要被bean实现的接口,一旦bean的属性被BeanFactory设置后需要做出反应: 如,执行自定义初始化,或者仅仅是检查是否设置了所有强制属性。
实现InitializingBean 的可替代方式为给bean指定一个自定义的init-method,例如在一个xml bean 定义中。
在bean的属性设置之后进行操作,不返回任何值但是允许抛出异常。
DisposableBean接口:
public interface DisposableBean {void destroy() throws Exception;}
被bean实现的接口,在销毁时释放资源,在Bean销毁的时候调用该方法。
如果销毁一个缓存的单例,一个BeanFactory 可能会调用这个销毁方法。
在容器关闭时,应用上下文会销毁所有的单例bean。
一种替代实现DisposableBean 接口的方案为指定一个自定义的destroy-method方法,例如在一个xml bean定义中。
自定义bean实现上述两个接口
@Componentpublic class Cat implements InitializingBean,DisposableBean {public Cat(){System.out.println('cat constructor...');}@Overridepublic void destroy() throws Exception {// TODO Auto-generated method stubSystem.out.println('cat...destroy...');}@Overridepublic void afterPropertiesSet() throws Exception {// TODO Auto-generated method stubSystem.out.println('cat...afterPropertiesSet...');}}
测试结果
cat constructor...cat...afterPropertiesSet...容器创建完成...四月 08, 2018 6:35:46 下午 org.springframework.context.annotation.AnnotationConfigApplicationContext doClose信息: Closing org.springframework.context.annotation.AnnotationConfigApplicationContext@11028347: startup date [Sun Apr 08 18:35:46 CST 2018]; root of context hierarchycat...destroy...
【3】@PostConstruct和@PreDestroy
使用JSR250规范定义的两个注解:
@PostConstruct: PostConstruct注解作用在方法上,在依赖注入完成后进行一些初始化操作。这个方法在类被放入service之前被调用,所有支持依赖项注入的类都必须支持此注解。
@PreDestroy:在容器销毁bean之前通知我们进行清理工作
自定义类使用上述两个注解
@Componentpublic class Dog implements ApplicationContextAware {//@Autowiredprivate ApplicationContext applicationContext;public Dog(){System.out.println('dog constructor...');}//对象创建并赋值之后调用@PostConstructpublic void init(){System.out.println('Dog....@PostConstruct...');}//容器移除对象之前@PreDestroypublic void detory(){System.out.println('Dog....@PreDestroy...');}@Overridepublic void setApplicationContext(ApplicationContext applicationContext) throws BeansException {// TODO Auto-generated method stubthis.applicationContext = applicationContext;}}
测试结果如下
dog constructor...Dog....@PostConstruct...容器创建完成...四月 08, 2018 6:42:11 下午 org.springframework.context.annotation.AnnotationConfigApplicationContext doClose信息: Closing org.springframework.context.annotation.AnnotationConfigApplicationContext@11028347: startup date [Sun Apr 08 18:42:10 CST 2018]; root of context hierarchyDog....@PreDestroy...
【4】BeanPostProcessor-Bean后置处理器
① 什么是bean后置处理器
在bean初始化前后进行一些处理工作
postProcessBeforeInitialization:在初始化之前工作 postProcessAfterInitialization:在初始化之后工作其接口源码如下:
public interface BeanPostProcessor {Object postProcessBeforeInitialization(Object bean, String beanName) throws BeansException;Object postProcessAfterInitialization(Object bean, String beanName) throws BeansException;}
自定义MyBeanPostProcessor实现该接口:
/** * 后置处理器:初始化前后进行处理工作 * 将后置处理器加入到容器中 * @author lfy */@Componentpublic class MyBeanPostProcessor implements BeanPostProcessor {@Overridepublic Object postProcessBeforeInitialization(Object bean, String beanName) throws BeansException {// TODO Auto-generated method stubSystem.out.println('BeanPostProcessor.postProcessBeforeInitialization...'+beanName+'=>'+bean);return bean;}@Overridepublic Object postProcessAfterInitialization(Object bean, String beanName) throws BeansException {// TODO Auto-generated method stubSystem.out.println('BeanPostProcessor.postProcessAfterInitialization...'+beanName+'=>'+bean);return bean;}}
② BeanPostProcessor原理
AbstractAutowireCapableBeanFactory中关于bean和BeanPostProcessor执行次序由上到下
//给bean进行属性赋值populateBean(beanName, mbd, instanceWrapper);//然后调用initializeBean方法Object initializeBean(final String beanName, final Object bean, RootBeanDefinition mbd){applyBeanPostProcessorsBeforeInitialization(wrappedBean, beanName);//执行自定义初始化invokeInitMethods(beanName, wrappedBean, mbd);applyBeanPostProcessorsAfterInitialization(wrappedBean, beanName);}
AbstractAutowireCapableBeanFactory.initializeBean源码如下:
protected Object initializeBean(final String beanName, final Object bean, RootBeanDefinition mbd) {if (System.getSecurityManager() != null) {AccessController.doPrivileged(new PrivilegedAction<Object>() {@Overridepublic Object run() {invokeAwareMethods(beanName, bean);return null;}}, getAccessControlContext());}else {//调用意识/通知方法invokeAwareMethods(beanName, bean);}Object wrappedBean = bean;if (mbd == null || !mbd.isSynthetic()) {//调用bean后置处理器的前置方法wrappedBean = applyBeanPostProcessorsBeforeInitialization(wrappedBean, beanName);}//调用初始化方法try {invokeInitMethods(beanName, wrappedBean, mbd);}catch (Throwable ex) {throw new BeanCreationException((mbd != null ? mbd.getResourceDescription() : null),beanName, 'Invocation of init method failed', ex);}if (mbd == null || !mbd.isSynthetic()) {////调用bean后置处理器的后置方法wrappedBean = applyBeanPostProcessorsAfterInitialization(wrappedBean, beanName);}return wrappedBean;}
AbstractAutowireCapableBeanFactory.invokeInitMethods方法源码如下:
protected void invokeInitMethods(String beanName, final Object bean, RootBeanDefinition mbd)throws Throwable {boolean isInitializingBean = (bean instanceof InitializingBean);if (isInitializingBean && (mbd == null || !mbd.isExternallyManagedInitMethod('afterPropertiesSet'))) {if (logger.isDebugEnabled()) {logger.debug('Invoking afterPropertiesSet() on bean with name ’' + beanName + '’');}//调用InitializingBean.afterPropertiesSetif (System.getSecurityManager() != null) {try {AccessController.doPrivileged(new PrivilegedExceptionAction<Object>() {@Overridepublic Object run() throws Exception {((InitializingBean) bean).afterPropertiesSet();return null;}}, getAccessControlContext());}catch (PrivilegedActionException pae) {throw pae.getException();}}else {((InitializingBean) bean).afterPropertiesSet();}}//调用自定义初始化方法if (mbd != null) {String initMethodName = mbd.getInitMethodName();if (initMethodName != null && !(isInitializingBean && 'afterPropertiesSet'.equals(initMethodName)) &&!mbd.isExternallyManagedInitMethod(initMethodName)) {invokeCustomInitMethod(beanName, bean, mbd);}}}
【5】Spring底层使用BeanPostProcessor
Spring框架底层存在大量BeanPostProcessor,如下图:
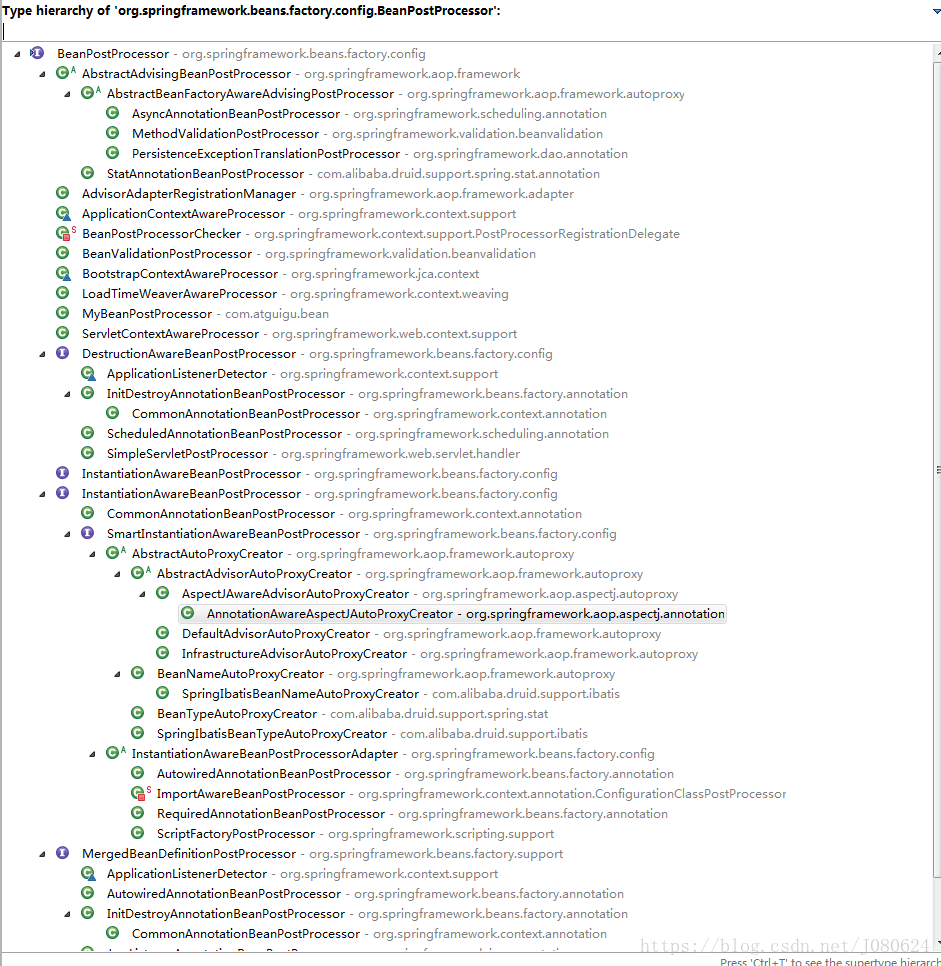
示例一 :BeanValidationPostProcessor是处理bean校验
其Javadoc如下:
/** * Simple {@link BeanPostProcessor} that checks JSR-303 constraint annotations * in Spring-managed beans, throwing an initialization exception in case of * constraint violations right before calling the bean’s init method (if any). * * @author Juergen Hoeller * @since 3.0 */public class BeanValidationPostProcessor implements BeanPostProcessor, InitializingBean {private Validator validator;private boolean afterInitialization = false;//...}
示例二:ApplicationContextAwareProcessor帮助获取容器上下文
其Javadoc如下:
/** * {@link org.springframework.beans.factory.config.BeanPostProcessor} * implementation that passes the ApplicationContext to beans that * implement the {@link EnvironmentAware}, {@link EmbeddedValueResolverAware}, * {@link ResourceLoaderAware}, {@link ApplicationEventPublisherAware}, * {@link MessageSourceAware} and/or {@link ApplicationContextAware} interfaces. * * <p>Implemented interfaces are satisfied in order of their mention above. * * <p>Application contexts will automatically register this with their * underlying bean factory. Applications do not use this directly. * * @author Juergen Hoeller * @author Costin Leau * @author Chris Beams * @since 10.10.2003 * @see org.springframework.context.EnvironmentAware * @see org.springframework.context.EmbeddedValueResolverAware * @see org.springframework.context.ResourceLoaderAware * @see org.springframework.context.ApplicationEventPublisherAware * @see org.springframework.context.MessageSourceAware * @see org.springframework.context.ApplicationContextAware * @see org.springframework.context.support.AbstractApplicationContext#refresh() */class ApplicationContextAwareProcessor implements BeanPostProcessor {private final ConfigurableApplicationContext applicationContext;private final StringValueResolver embeddedValueResolver;//...}
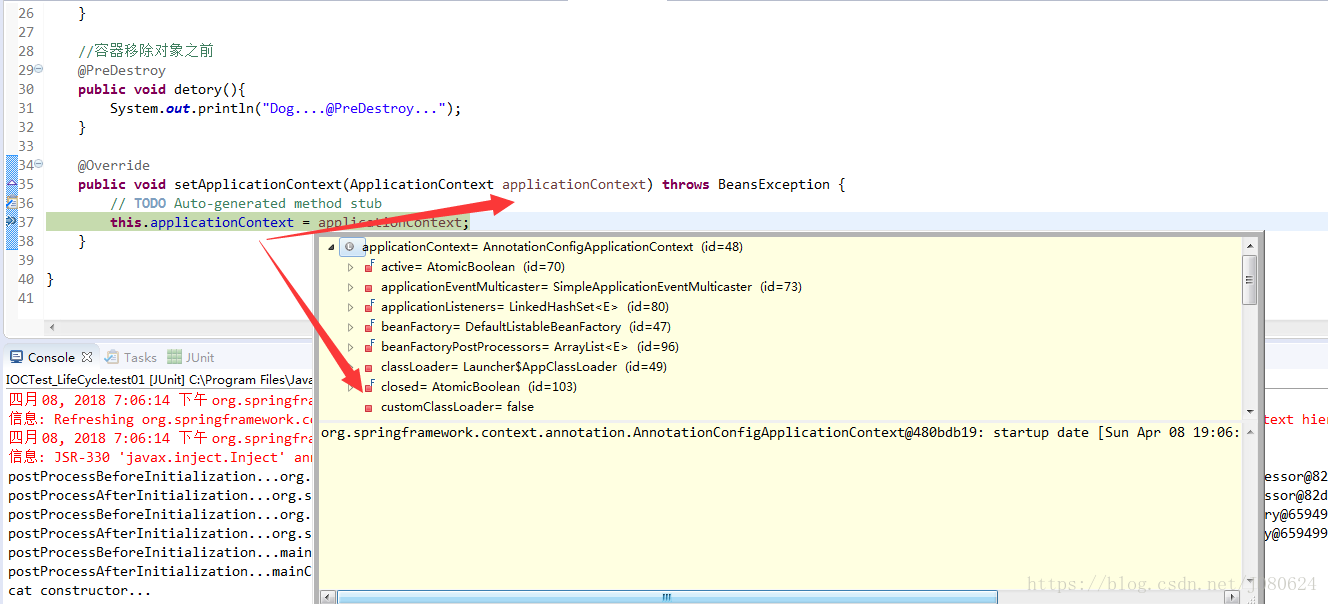
如【3】中的dog类为例,其debug示意图如下:
【6】初始化和销毁方式测试
① 如果一个bean 综合应用下面六种种方式,执行顺序会怎样呢
Bean类如下:
public class Person implements InitializingBean,DisposableBean { private String name; private Integer age=1; public Person(String name, Integer age) { this.name = name; this.age = age; System.out.println('Person(String name, Integer age) constructor'+this); } public Person() { super(); System.out.println('Person() constructor'+age); } public Integer getAge() { return age; } public void setAge(Integer age) { this.age = age; } public String getName() { return name; } public void setName(String name) { this.name = name; } @Override public String toString() { return 'Person{' +'name=’' + name + ’’’ +', age=' + age +’}’; }// 自定义init方法 public void init(){ System.out.println('-----Person.init()-----'+this); } // 自定义销毁方法 public void cleanUp(){ System.out.println('-----Person.cleanUp()-----'+this); }// InitializingBean的实现方法 @Override public void afterPropertiesSet() throws Exception { System.out.println('-----InitializingBean.afterPropertiesSet()-----'+this); }//DisposableBean 的实现方法 @Override public void destroy() throws Exception { System.out.println('-----DisposableBean.destroy()-----'+this); } //对象创建并赋值之后调用 @PostConstruct public void init2(){ System.out.println('-----@PostConstruct-----'+this); } //容器移除对象之前 @PreDestroy public void destory2(){ System.out.println('-----@PreDestroy-----'+this); }}
配置类如下:
public class Person implements InitializingBean,DisposableBean { private String name; private Integer age=1; public Person(String name, Integer age) { this.name = name; this.age = age; System.out.println('Person(String name, Integer age) constructor'+this); } public Person() { super(); System.out.println('Person() constructor'+age); } public Integer getAge() { return age; } public void setAge(Integer age) { this.age = age; } public String getName() { return name; } public void setName(String name) { this.name = name; } @Override public String toString() { return 'Person{' +'name=’' + name + ’’’ +', age=' + age +’}’; }// 自定义init方法 public void init(){ System.out.println('-----Person.init()-----'+this); } // 自定义销毁方法 public void cleanUp(){ System.out.println('-----Person.cleanUp()-----'+this); }// InitializingBean的实现方法 @Override public void afterPropertiesSet() throws Exception { System.out.println('-----InitializingBean.afterPropertiesSet()-----'+this); }//DisposableBean 的实现方法 @Override public void destroy() throws Exception { System.out.println('-----DisposableBean.destroy()-----'+this); } //对象创建并赋值之后调用 @PostConstruct public void init2(){ System.out.println('-----@PostConstruct-----'+this); } //容器移除对象之前 @PreDestroy public void destory2(){ System.out.println('-----@PreDestroy-----'+this); }}
测试结果如下:
// 创建并初始化Person(String name, Integer age) constructorPerson{name=’lisi’, age=20}-----@PostConstruct-----Person{name=’lisi’, age=20}-----InitializingBean.afterPropertiesSet()-----Person{name=’lisi’, age=20}-----Person.init()-----Person{name=’lisi’, age=20}//容器将要销毁-----@PreDestroy-----Person{name=’lisi’, age=20}-----DisposableBean.destroy()-----Person{name=’lisi’, age=20}-----Person.cleanUp()-----Person{name=’lisi’, age=20}
即,最先使用bean的构造器为bean属性赋值,接着JSR250规范定义的两个注解,其次是InitializingBean和DisposableBean接口,最后才是我们自定义的初始化方法和销毁方法。注意,这里还没有引入BeanPostProcessor。
② 在①的基础上添加BeanPostProcessor
实例化bean并进行初始化
//调用构造方法Person(String name, Integer age) constructorPerson{name=’lisi’, age=20}//bean初始化前BeanPostProcessor.postProcessBeforeInitialization...person=>Person{name=’lisi’, age=20}//初始化操作-----@PostConstruct-----Person{name=’lisi’, age=20}-----InitializingBean.afterPropertiesSet()-----Person{name=’lisi’, age=20}-----Person.init()-----Person{name=’lisi’, age=20}//bean初始化后操作BeanPostProcessor.postProcessAfterInitialization...person=>Person{name=’lisi’, age=20}
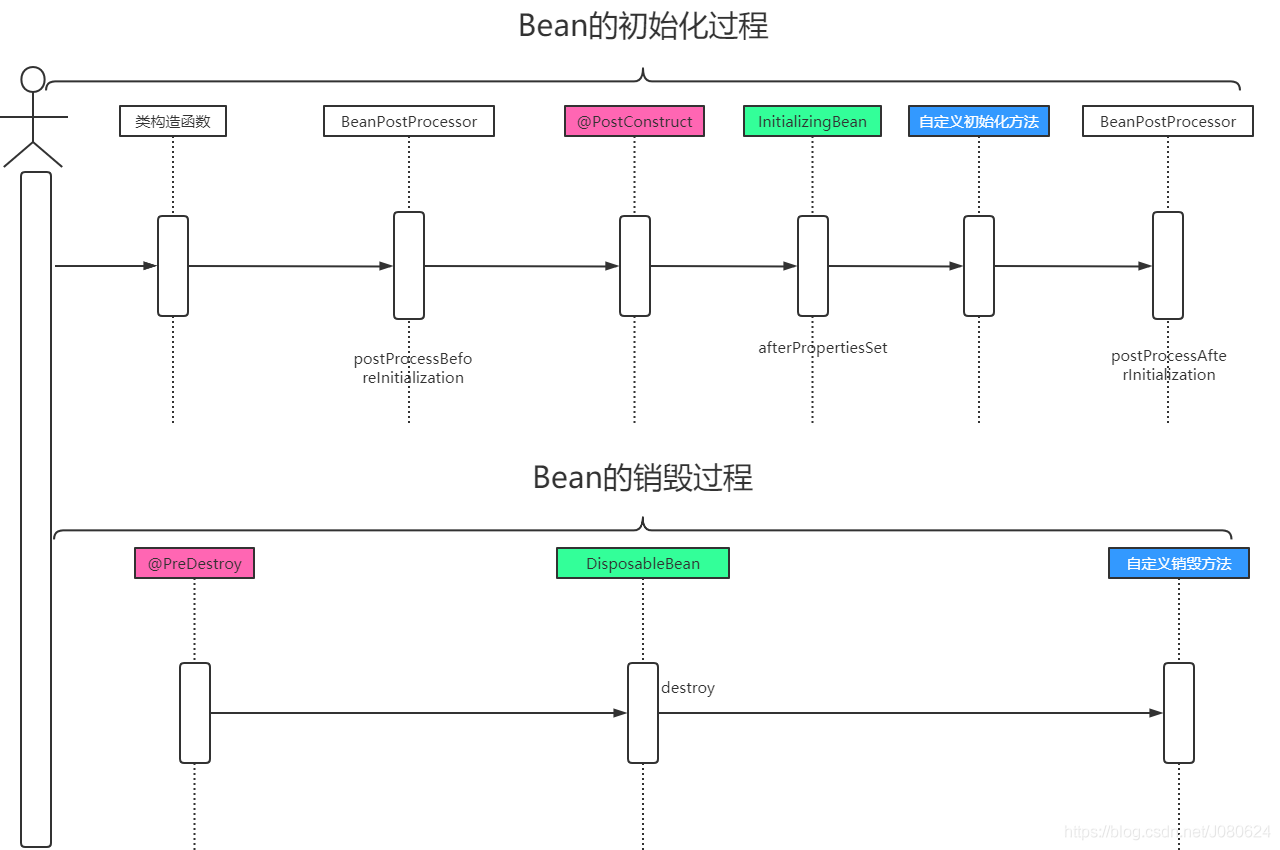
过程如下:类构造函数-->BeanPostProcessor-->@PostConstruct-->InitializingBean-->init()-->BeanPostProcessor
销毁bean
-----@PreDestroy-----Person{name=’lisi’, age=20}-----DisposableBean.destroy()-----Person{name=’lisi’, age=20}-----Person.cleanUp()-----Person{name=’lisi’, age=20}
完整图示如下(同颜色的说明相对应):
在调用bean的构造函数时会根据入参为bean属性赋值,如果入参为空则会给bean属性赋予默认值,引用类型为null,基本类型比如int为0。
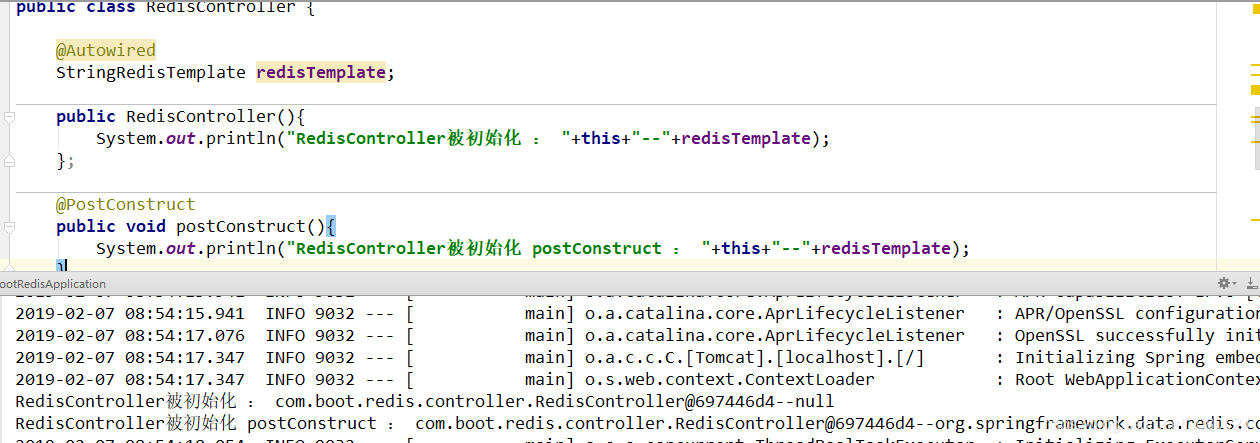
【7】 @Autowired注解的值何时放入?
如下所示,redisTemplate这个依赖何时被容器注入到RedisController中?
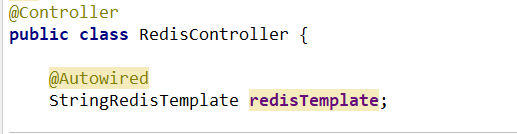
通过上面分析可知,依赖注入是在@PostConstruct注解的方法调用前被完成的(在populateBean()方法中被注入):
那么具体什么时候哪个类完成的 @Autowired注解注入依赖呢?
在类被实例化后由BeanPostProcessor完成的,哪个BeanPostProcessor?
具体是由AutowiredAnnotationBeanPostProcessor 完成的:

到此这篇关于Spring中bean的初始化和销毁几种实现方式详解的文章就介绍到这了,更多相关Spring中bean初始化和销毁内容请搜索好吧啦网以前的文章或继续浏览下面的相关文章希望大家以后多多支持好吧啦网!
相关文章:
 网公网安备
网公网安备