SpringBoot集成JWT生成token及校验方法过程解析
GitHub源码地址:https://github.com/zeng-xian-guo/springboot_jwt_token.git
封装JTW生成token和校验方法
public class JwtTokenUtil { //公用密钥-保存在服务端,客户端是不会知道密钥的,以防被攻击 public static String SECRET = 'ThisIsASecret'; //生成Troke public static String createToken(String username) { //签发时间 //Date iatDate = new Date(); //过地时间 1分钟后过期 //Calendar nowTime = Calendar.getInstance(); //nowTime.add(Calendar.MINUTE, 1); //Date expiresDate = nowTime.getTime(); Map<String, Object> map = new HashMap(); map.put('alg', 'HS256'); map.put('typ', 'JWT'); String token = JWT.create() .withHeader(map) //.withClaim( 'name','Free码生') //设置 载荷 Payload //.withClaim('age','12') //.withClaim( 'org','测试') //.withExpiresAt(expiresDate)//设置过期时间,过期时间要大于签发时间 //.withIssuedAt(iatDate)//设置签发时间 .withAudience(username) //设置 载荷 签名的观众 .sign(Algorithm.HMAC256(SECRET));//加密 System.out.println('后台生成token:' + token); return token; } //校验TOKEN public static boolean verifyToken(String token) throws UnsupportedEncodingException{ JWTVerifier verifier = JWT.require(Algorithm.HMAC256(SECRET)).build(); try { verifier.verify(token); return true; } catch (Exception e){ return false; } } //获取Token信息 public static DecodedJWT getTokenInfo(String token) throws UnsupportedEncodingException{ JWTVerifier verifier = JWT.require(Algorithm.HMAC256(SECRET)).build(); try{ return verifier.verify(token); } catch(Exception e){ throw new RuntimeException(e); } }}
新建自定义注解:@UserLoginToken
@Target({ElementType.METHOD, ElementType.TYPE})@Retention(RetentionPolicy.RUNTIME)public @interface UserLoginToken { boolean required() default true;}
关于拦截器配置:
@Configurationpublic class InterceptorConfig implements WebMvcConfigurer { @Override public void addInterceptors(InterceptorRegistry registry) { registry.addInterceptor(authenticationInterceptor()).addPathPatterns('/**'); // 拦截所有请求,通过判断是否有 @LoginRequired 注解 决定是否需要登录 } @Bean public AuthenticationInterceptor authenticationInterceptor() { return new AuthenticationInterceptor(); }}
public class AuthenticationInterceptor implements HandlerInterceptor { @Autowired UserService userService; @Override public boolean preHandle(HttpServletRequest httpServletRequest, HttpServletResponse httpServletResponse, Object object) throws Exception { String token = httpServletRequest.getHeader('token');// 从 http 请求头中取出 token // 如果不是映射到方法直接通过 if(!(object instanceof HandlerMethod)){ return true; } HandlerMethod handlerMethod=(HandlerMethod)object; Method method=handlerMethod.getMethod(); //检查是否有passtoken注释,有则跳过认证 if (method.isAnnotationPresent(PassToken.class)) { PassToken passToken = method.getAnnotation(PassToken.class); if (passToken.required()) {return true; } } //检查有没有需要用户权限的注解 if (method.isAnnotationPresent(UserLoginToken.class)) { UserLoginToken userLoginToken = method.getAnnotation(UserLoginToken.class); if (userLoginToken.required()) {// 执行认证if (token == null) { throw new RuntimeException('无token,请重新登录');}// 验证 tokenif(JwtTokenUtil.verifyToken(token)){ return true;}else { throw new RuntimeException('401');} } } return true; } @Override public void postHandle(HttpServletRequest httpServletRequest, HttpServletResponse httpServletResponse, Object o, ModelAndView modelAndView) throws Exception { } @Override public void afterCompletion(HttpServletRequest httpServletRequest, HttpServletResponse httpServletResponse, Object o, Exception e) throws Exception { }}
登录:
在Controller上登录方法不用添加@UserLoginToken自定义注解,其余获取后台数据方法加上@UserLoginToken自定义注解,目的验证token是否有效,是则返回数据,否则提示401无权限。
测试:
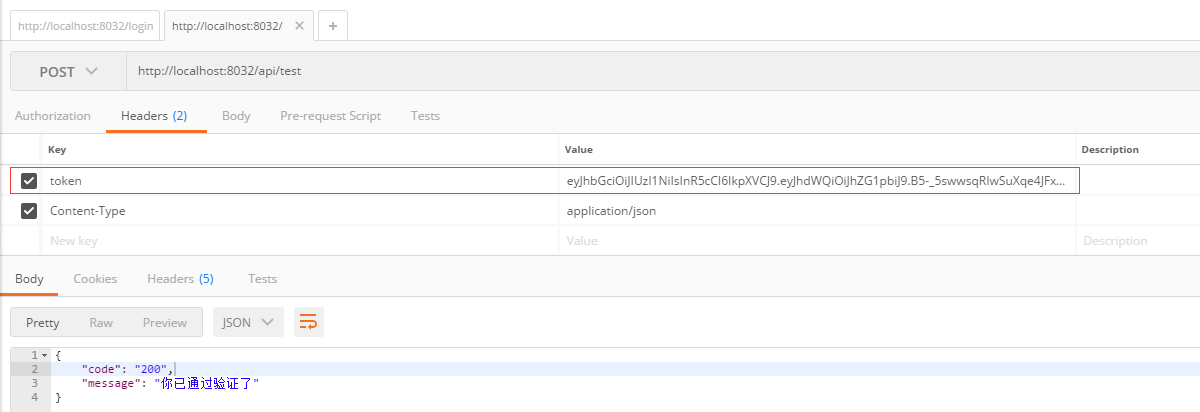
@Controller@RequestMapping(path = '/api')public class IndexController { private String prefix = 'index/'; @GetMapping('/index') public String index() { return prefix + 'index'; } @UserLoginToken @PostMapping('/test') @ResponseBody public Object test(){ Map<String,Object> map = new HashMap<>(); map.put('code','200'); map.put('message','你已通过验证了'); return map; }}
HTTP请求带上登陆成功后生成token,返回成功:
HTTP请求带上无效token或不带token,返回失败:

以上就是本文的全部内容,希望对大家的学习有所帮助,也希望大家多多支持好吧啦网。
相关文章:
 网公网安备
网公网安备