SpringSecurity整合springBoot、redis实现登录互踢功能
基于我的文章——《SpringSecurity整合springBoot、redis token动态url权限校验》。要实现的功能是要实现一个用户不可以同时在两台设备上登录,有两种思路:(1)后来的登录自动踢掉前面的登录。(2)如果用户已经登录,则不允许后来者登录。需要特别说明的是,项目的基础是已经是redis维护的session。
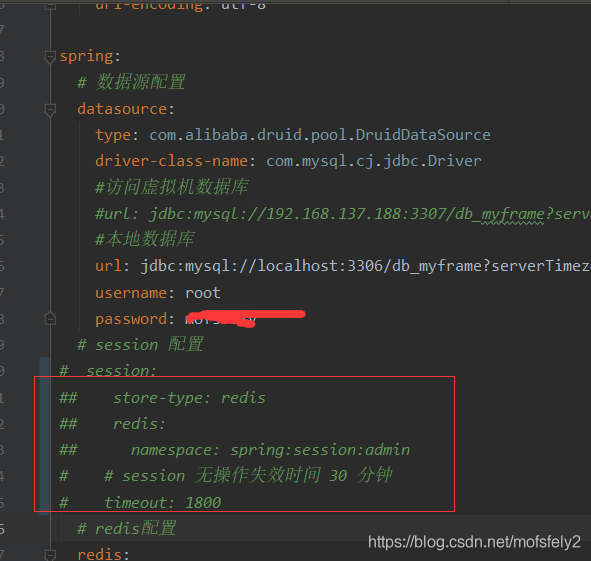
配置redisHttpSession设置spring session由redis 管理。2.1去掉yml中的http session 配置,yml和注解两者只选其一(同时配置,只有注解配置生效)。至于为什么不用yml,待会提到。
2.2 webSecurityConfig中加入注解@EnableRedisHttpSession
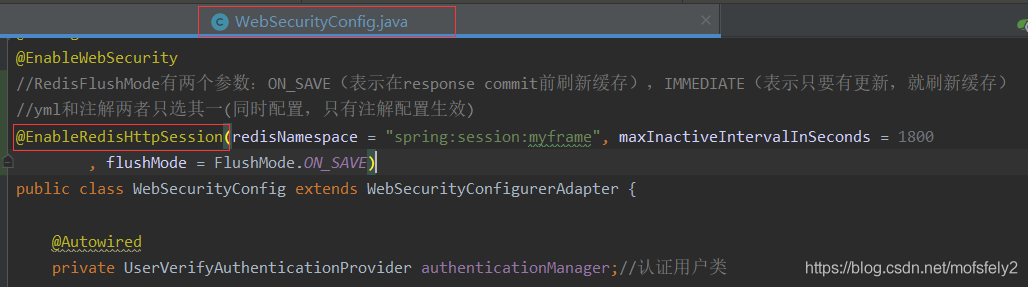
@EnableRedisHttpSession(redisNamespace = 'spring:session:myframe', maxInactiveIntervalInSeconds = 1700, flushMode = FlushMode.ON_SAVE)
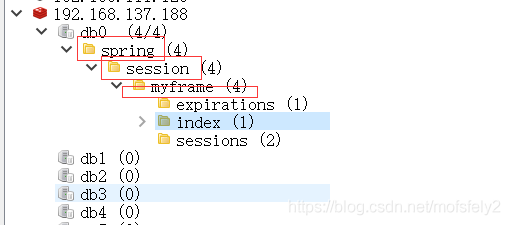
登录后发现redis session namespace已经是我们命名的了
我们要限制一个用户的登录,自然要获取他在系统中的所有session。
2.再去查看springsSession官网的文档。springsession官网 提供文档https://docs.spring.io/spring-session/docs/ 2.2.2.RELEASE/reference/html5/#api-findbyindexnamesessionrepository
SessionRepository实现也可以选择实现FindByIndexNameSessionRepository
FindByIndexNameSessionRepository提供一种方法,用于查找具有给定索引名称和索引值的所有会话
FindByIndexNameSessionRepository实现时,可以使用方便的方法查找特定用户的所有会话
/** * redis获取sessionRepository * RedisIndexedSessionRepository实现 FindByIndexNameSessionRepository接口 */ @Autowired //不加@Lazy这个会报什么循环引用... // Circular reference involving containing bean ’.RedisHttpSessionConfiguration’ @Lazy private FindByIndexNameSessionRepository<? extends Session> sessionRepository;
这里注意一点,当我通过yml配置redis session是,sessionRepository下面会有红线。
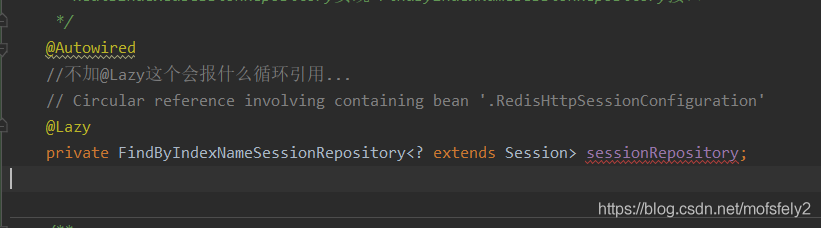
虽然不影响运行,但是强迫症,所以改用@EnableWebSecurity注解(至于为什么?我也不想知道…)。
将sessionRepository注入SpringSessionBackedSessionRegistry是spring session为Spring Security提供的什么会话并发的会话注册表实现,大概是让springSecurity帮我们去限制登录,光一个sessionRepository是不行的,还得自己加点工具什么的。webSecurityConfig加入:
/** * 是spring session为Spring Security提供的, * 用于在集群环境下控制会话并发的会话注册表实现 * @return */ @Bean public SpringSessionBackedSessionRegistry sessionRegistry(){return new SpringSessionBackedSessionRegistry<>(sessionRepository); }
注:https://blog.csdn.net/qq_34136709/article/details/106012825 这篇文章说还需要加一个HttpSessionEventPublisher来监听session销毁云云,大概是因为我用的是redis session吧,不需要这个,要了之后还会报错,啥错?我忘了。
新增一个session过期后的处理类先创建一个CustomSessionInformationExpiredStrategy.java来处理session过期后如何通知前端的处理类,内容如下:
public class CustomSessionInformationExpiredStrategy implements SessionInformationExpiredStrategy { @Override public void onExpiredSessionDetected(SessionInformationExpiredEvent event) throws IOException {if (log.isDebugEnabled()) { log.debug('{} {}', event.getSessionInformation(), MessageConstant.SESSION_EVICT);}HttpServletResponse response = event.getResponse();response.setContentType(MediaType.APPLICATION_JSON_VALUE);response.setCharacterEncoding(StandardCharsets.UTF_8.toString());String responseJson = JackJsonUtil.object2String(ResponseFactory.fail(CodeMsgEnum.SESSION_EVICT, MessageConstant.SESSION_EVICT));response.getWriter().write(responseJson); }}
注:一般都是自己重新写返回前端的信息,不会直接用框架抛出的错误信息
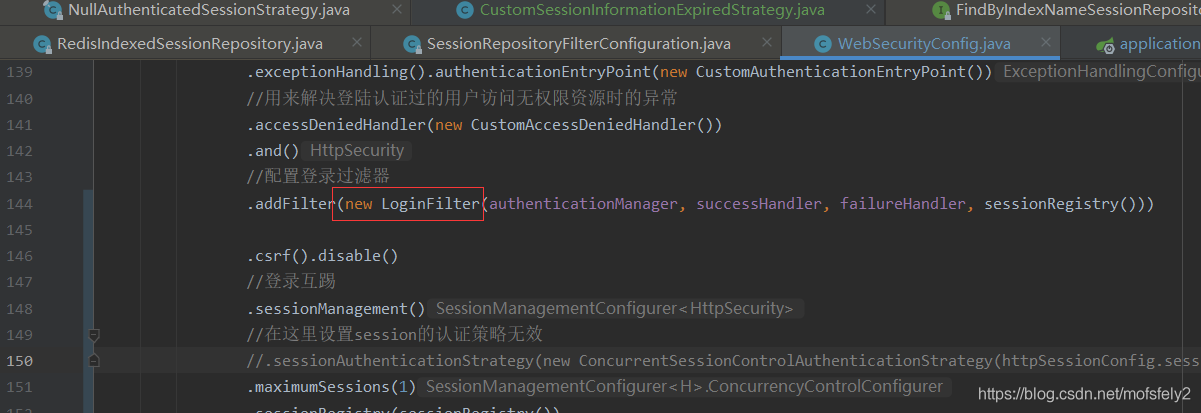
配置到configure(HttpSecurity http)方法上.csrf().disable()//登录互踢.sessionManagement()//在这里设置session的认证策略无效//.sessionAuthenticationStrategy(new ConcurrentSessionControlAuthenticationStrategy(httpSessionConfig.sessionRegistry())).maximumSessions(1).sessionRegistry(sessionRegistry()).maxSessionsPreventsLogin(false) //false表示不阻止登录,就是新的覆盖旧的//session失效后要做什么(提示前端什么内容).expiredSessionStrategy(new CustomSessionInformationExpiredStrategy());
注意:https://blog.csdn.net/qq_34136709/article/details/106012825 这篇文章说session认证的原理,我看到它是执行了一个session的认证策略,但是我debug对应的代码时,发现
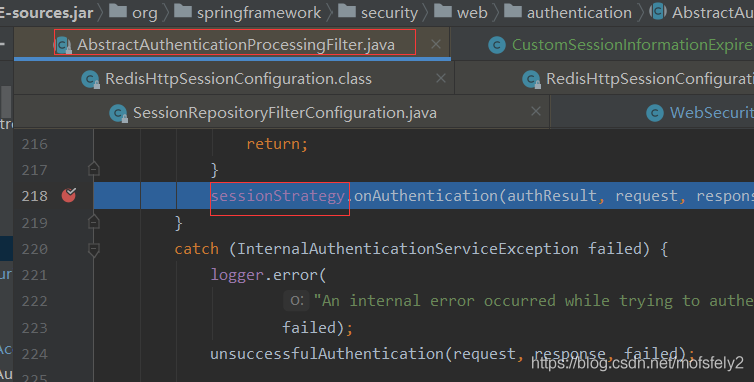
这个session认证策略是NullAuthenticatedSessionStrategy,而不是它说的ConcurrentSessionControlAuthenticationStrategy。就是说我需要在哪里去配置这个session 认证策略。第一时间想到了configure(HttpSecurity http)里面配置

结果无效。之后看到别人的代码,想到这个策略应该是要在登录的时候加上去,而我们的登录一般都需要自己重写,自然上面的写法会无效。于是我找到了自定义的登录过滤器。
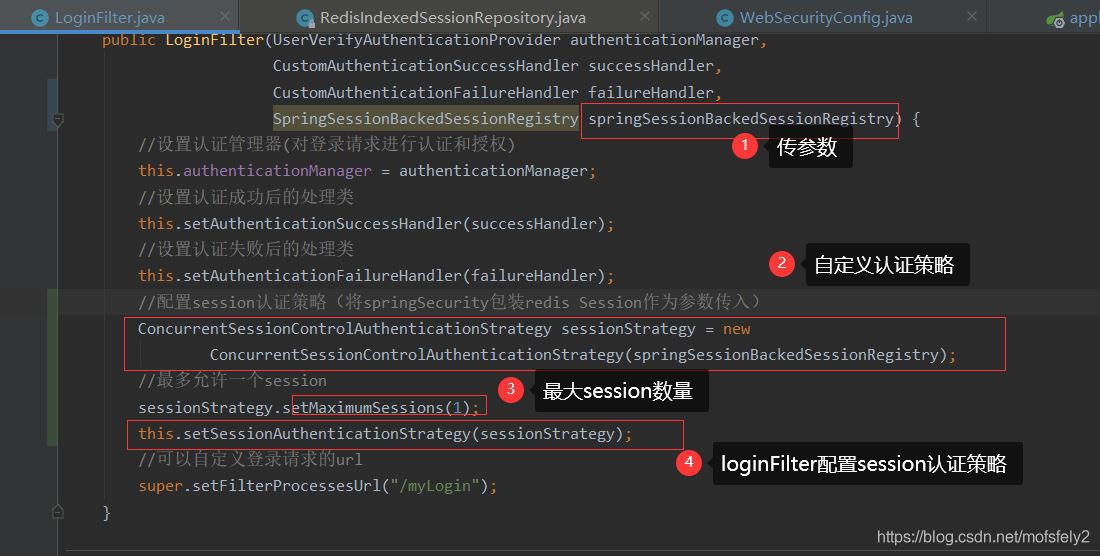
然后发现this.setSessionAuthenticationStrategy(sessionStrategy);确实存在。
public LoginFilter(UserVerifyAuthenticationProvider authenticationManager, CustomAuthenticationSuccessHandler successHandler, CustomAuthenticationFailureHandler failureHandler, SpringSessionBackedSessionRegistry springSessionBackedSessionRegistry) {//设置认证管理器(对登录请求进行认证和授权)this.authenticationManager = authenticationManager;//设置认证成功后的处理类this.setAuthenticationSuccessHandler(successHandler);//设置认证失败后的处理类this.setAuthenticationFailureHandler(failureHandler);//配置session认证策略(将springSecurity包装redis Session作为参数传入)ConcurrentSessionControlAuthenticationStrategy sessionStrategy = newConcurrentSessionControlAuthenticationStrategy(springSessionBackedSessionRegistry);//最多允许一个sessionsessionStrategy.setMaximumSessions(1);this.setSessionAuthenticationStrategy(sessionStrategy);//可以自定义登录请求的urlsuper.setFilterProcessesUrl('/myLogin'); }
启动 后就发现session认证策略已经改为我们设定的策略了。
完整的webSecurityConfig如下:
@Configuration@EnableWebSecurity//RedisFlushMode有两个参数:ON_SAVE(表示在response commit前刷新缓存),IMMEDIATE(表示只要有更新,就刷新缓存)//yml和注解两者只选其一(同时配置,只有注解配置生效)@EnableRedisHttpSession(redisNamespace = 'spring:session:myframe', maxInactiveIntervalInSeconds = 5000, flushMode = FlushMode.ON_SAVE)public class WebSecurityConfig extends WebSecurityConfigurerAdapter { @Autowired private UserVerifyAuthenticationProvider authenticationManager;//认证用户类 @Autowired private CustomAuthenticationSuccessHandler successHandler;//登录认证成功处理类 @Autowired private CustomAuthenticationFailureHandler failureHandler;//登录认证失败处理类 @Autowired private MyFilterInvocationSecurityMetadataSource securityMetadataSource;//返回当前URL允许访问的角色列表 @Autowired private MyAccessDecisionManager accessDecisionManager;//除登录登出外所有接口的权限校验 /** * redis获取sessionRepository * RedisIndexedSessionRepository实现 FindByIndexNameSessionRepository接口 */ @Autowired //不加@Lazy这个会报什么循环引用... // Circular reference involving containing bean ’.RedisHttpSessionConfiguration’ @Lazy private FindByIndexNameSessionRepository<? extends Session> sessionRepository; /** * 是spring session为Spring Security提供的, * 用于在集群环境下控制会话并发的会话注册表实现 * @return */ @Bean public SpringSessionBackedSessionRegistry sessionRegistry(){return new SpringSessionBackedSessionRegistry<>(sessionRepository); } /** * 密码加密 * @return */ @Bean @ConditionalOnMissingBean(PasswordEncoder.class) public PasswordEncoder passwordEncoder() {return new BCryptPasswordEncoder(); } /** * 配置 HttpSessionIdResolver Bean * 登录之后将会在 Response Header x-auth-token 中 返回当前 sessionToken * 将token存储在前端 每次调用的时候 Request Header x-auth-token 带上 sessionToken */ @Bean public HttpSessionIdResolver httpSessionIdResolver() {return HeaderHttpSessionIdResolver.xAuthToken(); } /** * Swagger等静态资源不进行拦截 */ @Override public void configure(WebSecurity web) {web.ignoring().antMatchers('/*.html','/favicon.ico','/**/*.html','/**/*.css','/**/*.js','/error','/webjars/**','/resources/**','/swagger-ui.html','/swagger-resources/**','/v2/api-docs'); } @Override protected void configure(HttpSecurity http) throws Exception {http.authorizeRequests()//配置一些不需要登录就可以访问的接口,这里配置失效了,放到了securityMetadataSource里面//.antMatchers('/demo/**', '/about/**').permitAll()//任何尚未匹配的URL只需要用户进行身份验证.anyRequest().authenticated()//登录后的接口权限校验.withObjectPostProcessor(new ObjectPostProcessor<FilterSecurityInterceptor>() { @Override public <O extends FilterSecurityInterceptor> O postProcess(O object) {object.setAccessDecisionManager(accessDecisionManager);object.setSecurityMetadataSource(securityMetadataSource);return object; }}).and()//配置登出处理.logout().logoutUrl('/logout').logoutSuccessHandler(new CustomLogoutSuccessHandler()).clearAuthentication(true).and()//用来解决匿名用户访问无权限资源时的异常.exceptionHandling().authenticationEntryPoint(new CustomAuthenticationEntryPoint())//用来解决登陆认证过的用户访问无权限资源时的异常.accessDeniedHandler(new CustomAccessDeniedHandler()).and()//配置登录过滤器.addFilter(new LoginFilter(authenticationManager, successHandler, failureHandler, sessionRegistry())).csrf().disable()//登录互踢.sessionManagement()//在这里设置session的认证策略无效//.sessionAuthenticationStrategy(new ConcurrentSessionControlAuthenticationStrategy(httpSessionConfig.sessionRegistry())).maximumSessions(1).sessionRegistry(sessionRegistry()).maxSessionsPreventsLogin(false) //false表示不阻止登录,就是新的覆盖旧的//session失效后要做什么(提示前端什么内容).expiredSessionStrategy(new CustomSessionInformationExpiredStrategy());//配置头部http.headers().contentTypeOptions().and().xssProtection().and()//禁用缓存.cacheControl().and().httpStrictTransportSecurity().and()//禁用页面镶嵌frame劫持安全协议 // 防止iframe 造成跨域.frameOptions().disable(); }}
其他
@Lazyprivate FindByIndexNameSessionRepository<? extends Session> sessionRepository;
至于这个不加@lazy会什么循环引用的问题,我就真的不想理会了。看了好长时间,都不知道谁和谁发生了循环引用。。。。。
到此这篇关于SpringSecurity整合springBoot、redis——实现登录互踢的文章就介绍到这了,更多相关SpringSecurity登录互踢内容请搜索好吧啦网以前的文章或继续浏览下面的相关文章希望大家以后多多支持好吧啦网!
相关文章:
 网公网安备
网公网安备